
Before installing a light switch, turn off power at the fuse box. Using a multi-tool or wire cutters, strip the ends of one black, one white and one bare copper wire (or a white wire with black tape that indicates it's being used as a hot wire).
Using pliers, form the exposed lengths into rounded hook shapes that will fit securely around the terminal screws on your new switch.
Wires
As with any electrical work, always turn off power at the breaker box before attempting to wire a light switch. This will ensure that you don’t accidentally create a short circuit by working with live wires. If you’re unsure about how to safely disconnect the wires, consult an electrician before attempting any home improvement projects. It’s also important to read the directions on your new switch, since they may differ from those of older switches.
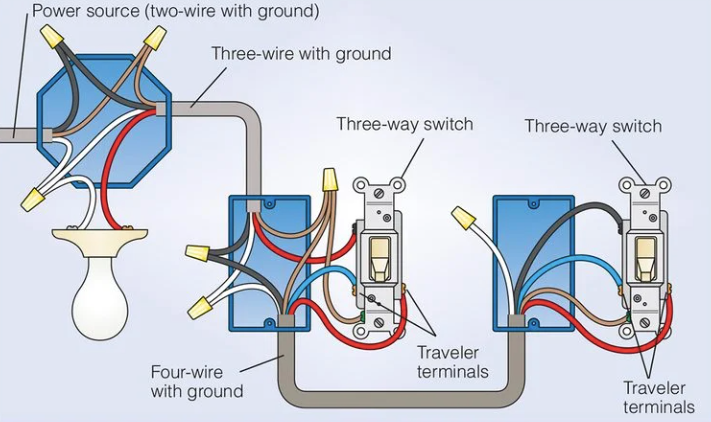
In the box where your switch is installed, you’ll see two white (neutral) wires connected to each other and covered with a wire nut. There will also be a black wire and, often, a red or other colored wire that connect to the switch using screw terminals (called “switches” by electricians). If your house has a ground wire, it’ll usually be attached to a green or bare copper screw in the electrical box or switch plate.
If you’re not sure whether your wires are hot or neutral, you can test them with a multitool or pliers. Look for signs of fraying on the ends of each wire, and clip off any degraded portions. Be sure to leave about a half-inch of bare wire on each end.
Some newer homes use push-in wire connectors instead of screws to attach the wires to the switch. If you see this, it’s best to loosen the push-in connections and free the wires from their old switch before installing the new one. Some “smart” switches, which can be controlled by smartphones or other devices, require a neutral wire to maintain a wireless connection and are best installed according to the manufacturer’s instructions.
Once the wires are detached, you’ll have to decide what to do with them. You can reconnect them to the same switch by using the screws provided or run a new cable from your electrical box to your fixture. If you’re going with the latter, make sure that the cable is thick enough to carry the load of your fixture, which could be as heavy as a light bulb or more.

Wire Nuts
Light switch wiring is something many homeowners can do themselves without the need for a licensed electrician. However, it is still important to follow the proper safety procedures, starting with turning off the power to the circuit you're working on at your main breaker box. Also, make sure you have the right tools to complete the job.
For single-pole switches, you'll need a screwdriver and a pair of wire strippers. You should always wear rubber electrical gloves and soled shoes for safety. Electricity can jump from conductors to you through metal or water, and these protective materials will help prevent injuries.
To prepare for the wiring, first use your wire strippers to remove about half an inch of insulation from each end of a two or three-strand 16 gauge wire. Next, twist the bare ends together and cover them with a wire nut. Be careful not to over tighten the nut or you could damage the strands inside.
Now, you'll connect the black wire to one of the brass screws on the side of the switch (called terminal screws). This is the common wire that will be connected to both switches. You'll also connect the white wire in the second box to a different screw, which is the neutral wire. Be careful not to mix up the two, as the incorrect connections can cause a fire or electric shock.
Finally, you'll connect the shortest bare copper wire to the green grounding screw on the switch (Photo 5). Again, it's important to remember that the grounding wire isn't used for any of the switching or lighting functions, but for safety purposes only.
If you have a two-way switch, there are a few additional steps to take. First, you'll need to identify the com / c and l1 (Line out) terminals on the switch's electrical box. It's often easiest to do this by examining the existing switch and looking for which terminals it has attached wires to.
Then, disconnect the current wires and prepare for the new installation by punching a hole through the wall in the location of the switch box using your power drill. Cut a length of cable sheathing and push it into the knockout in your wall, leaving about 1/4 inch of sheathing visible inside the box. Strip about 8 inches of the sheathing from both wires and then cut off the excess at the switch box.

Wire Hooks
Electrical wiring is a system of insulated wires that carry electricity from your home's power source to different devices, including light switches. Before working on any electrical wiring, it's important to turn off the power at your circuit breaker box. This will prevent any accidental shorts from occurring and could potentially start a fire. Once the breaker has been turned off, you'll want to protect yourself by wearing rubber electrical gloves and a pair of safety glasses. You should also keep water and other liquids away from your work area, as they can conduct electricity.
Once the breaker is off, you can begin working on the switch. First, loosen the screw terminals holding the wires in place with a screwdriver. If your switch is connected to the other wires via push-in wire connectors, remove them by pushing a nail into the release slot next to each wire. Then, carefully pull away the old switch and discard it.
Inside the first switch box, you'll see eight wires. Two white (neutral) wires will be connected to each other and covered with a wire nut, and one black or copper wire that connects to a screw terminal in the box and is known as the common wire. This should be marked with black paint or tape to distinguish it from the other wires. You should also see three green or bare copper wires that connect to the ground terminal screw on the switch box and are labelled as ground wires.
Next, use a pair of pliers to unwind the tight coils of each wire and remove half an inch of insulation. This will expose a rounded hook shape that you can use to wrap around the brass screw terminals on your new switch. When the wire is wrapped, tighten the screw with your screwdriver. Repeat the process with the other white and black terminals, ensuring that the hook is positioned around the screw in a clockwise direction.
Then, connect the shortest green wire to the ground terminal screw on your new switch. Finally, connect the remaining green and black wires to their respective terminal screws on the switch box. Tighten all the screw terminal connections and then apply electrical tape to the screw connections and switch box to prevent any arcing. Once you've completed these steps, it's time to reinstall the switch and test it.

Terminals
It’s worth familiarising yourself with the terminals on a UK switch before you start working. Unlike the US, UK switches have two or three wires connected to each terminal. These are often labeled with the word “common” (C) and either a brown or blue wire. The brown wire is the live cable, while the blue is the switched live wire. If you have a two-way switch, you’ll also have an L1 and an L2 terminal, which control the switching of your light from different locations in the room (upstairs and downstairs).
Firstly, remove the old switch by loosening the screws holding it in place with a screwdriver. Then, take a look at the new switch to see how the terminals are configured. They are normally arranged in a triangle with two terminals at the top and one at the bottom, or vice-versa. This is because upstairs and downstairs lighting can be on separate circuits and the position of a switch controls which circuit it is connected to.
Next, connect the new switch to the existing wiring using its terminal screws. It is helpful to have a pair of needle-nose pliers for this, as you will need to bend the hooked ends around each screw’s hook to hold them in place. It is also a good idea to wrap the terminal screws in electrical tape to protect against fire, but don’t over-tighten them.
Finally, the last connection to make is from the switch to the mains wire, which should be a black or grey insulated cable. Connect this to the C or COM terminal on the switch, together with the brown wire from the 3 Core and Earth cable into your house. Then connect the other end of the cable to the L1 terminal on the new switch and to the L2 terminal on the old switch (if it has one).
Once you have made all of these connections, test the lights to ensure they are working correctly. You should be able to turn on the light from either of the two switches, although you will need to use both switches to get the lighting effect that you want. If you run into any problems, consult an electrician for help. Remember, working with electricity is dangerous, so it’s always best to let a professional take care of any electrical work in your home. Thanks for reading our guide on how to wire a light switch uk! Good luck and don’t forget to wear rubber gloves when working with electricity.